You need: graphite pencil, ruler, rubber, pencil sharpener, colour pencils
KEEP YOUR PENCILS SHARP
Draw lightly so that you can rub out easily.
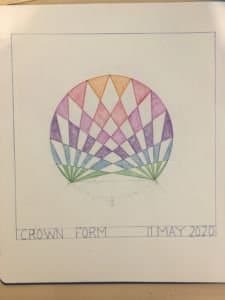
1. Using your graphite pencil: Draw a large square – as large as you can (yes
freehand) on your next blank page. You may use the edge of your paper as a guide,
keeping an even distance, gauging by your eye and your heart.
2. Find the centre using your eyes and your heart – no measuring, even with hands
and fingers – train your inner sense for balance and proportion
3. Draw a LARGE circle around the centre point. The rounder your circle, the more
accurate and proportionate your drawing will be.
4. Mark 16 *EQUIDISTANT points (make them small) on the *circumference of the
circle.
5. Mark the bottom centre point with an ‘x’. Find the second point on either side of ‘x’.
Label the left point ‘A’ and the right point ‘B’
6. Using your ruler, connect these two points. From point ‘A’, using your ruler, draw
straight lines connecting to every point above this connecting line
7. Repeat the process from point ‘B’
8. Choose 6 colours of coloured pencil. Start with the colour of your choice and
progress from that colour either to the warm side of the colour spectrum or the cool
side.
9. Draw a large square around your drawing with the title bar at the bottom. The title
for this drawing is CROWN FORM

During the creative process attention continually swings back and forth between what one is currently making, the form which arises in consequence, and the whole picture and composition. It involves oscillating between point-focused, targeted attention and a wider, more open and receptive mode. The artistic process can repeatedly come up against a moment of despair: nothing is working out. But there is always a way to resolve the problem, either through one’s own resources or with the teacher’s help: a way back to the assignment – or also to a new discovery. In looking at others’ works of art children see how differently the same assignment can work out. Here they find and give each other mutual stimulus and help.
Assignments supported main lesson themes. Students created dioramas for their animal projects, drew mandalas and painted in connection to their study of Ancient India, drew freehand geometric constructions.

You need: graphite pencil, ruler, rubber, pencil sharpener, colour pencils
KEEP YOUR PENCILS SHARP
Draw lightly so that you can rub out easily.
1. Using your graphite pencil: Draw a large square – as large as you can (yes
freehand) on your next blank page. You may use the edge of your paper as a guide,
keeping an even distance, gauging by your eye and your heart.
2. Find the centre using your eyes and your heart – no measuring, even with hands
and fingers – train your inner sense for balance and proportion
3. Draw a LARGE circle around the centre point. The rounder your circle, the more
accurate and proportionate your drawing will be.
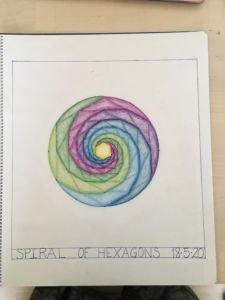
4. Mark 12 *EQUIDISTANT points on the *circumference of the circle and lightly
number them starting with 1 at the top The more evenly spaced your points, the
more accurate and the more beautiful your drawing will be.
5. Use your ruler to connect every other point to make a hexagon.
6. Line up your ruler with points 2 and 8 to find the centre of line 1,3 and line 7,9. Line
up your ruler with points 4 and 10 to find the centre of lines 3,5 and 9,11. Line up
your ruler with points 6 and 12 to find the centre of lines 5,7 and 11,1. Mark the
centre of these lines with a small point. Use your ruler to draw lines connecting
these points to make a new hexagon.
7. Repeat step 6 10-13 times, depending on the size of your circle. If you begin to
loose the shape of your hexagon, it’s time to stop.
8. Choose 6 colours of coloured pencil. Start with your lightest colour (in case you
make a mistake – it’ll be easier to rub out)
9. Lightly mark one outer section of the circle, then working your way towards the
centre, one triangle of the largest hexagon, then one triangle of the adjacent one
and so on until you get to the centre. You can leave the centre hexagon uncoloured
or use golden yellow.
10. Using the side of your pencil lead shade in the triangles.
